Introduction
This beginner-friendly guide is designed to help you go from knowing much about GIT to understanding how to use it within a professional software development team.
As a beginner programmer, jumping straight into learning programming languages and frameworks is really tempting.
Learning skills to solve real-world problems by creating tools is fascinating, and it feels like you have just acquired a superpower. The ability to think of an idea and develop it into a functional prototype is one of the most fascinating aspects of being able to code.
However, it’s crucial to understand that programming is a team sport.
It doesn’t matter how good you are at writing code; sharing it with others is what matters the most.
Being effective at sharing your code increases your ability to build apps exponentially because you can integrate the work done by others faster.
Having something to share implies history. History implies versions and iterations, and sharing it requires a way to control them.
This is where version control tools like GIT come into play.
In this guide, I will:
- Explain what version control tools like GIT are.
- Make a case for why learning GIT is equally as important as coding.
- Tell a quick history lesson about how GIT came to be. (Spoiler alert it has a lot to do with Linux and the guy who invented the first phone).
- Provide actionable steps on how to start learning GIT.
- Give real-world examples of how professional software development teams use GIT.
- Share links to visual GIT tools for those who prefer to work visually.
- Provide resources for further reading.
If these points sound helpful to you, keep reading.
What problem does version control solve?
So why sharing your code is so important? And what does sharing mean exactly?
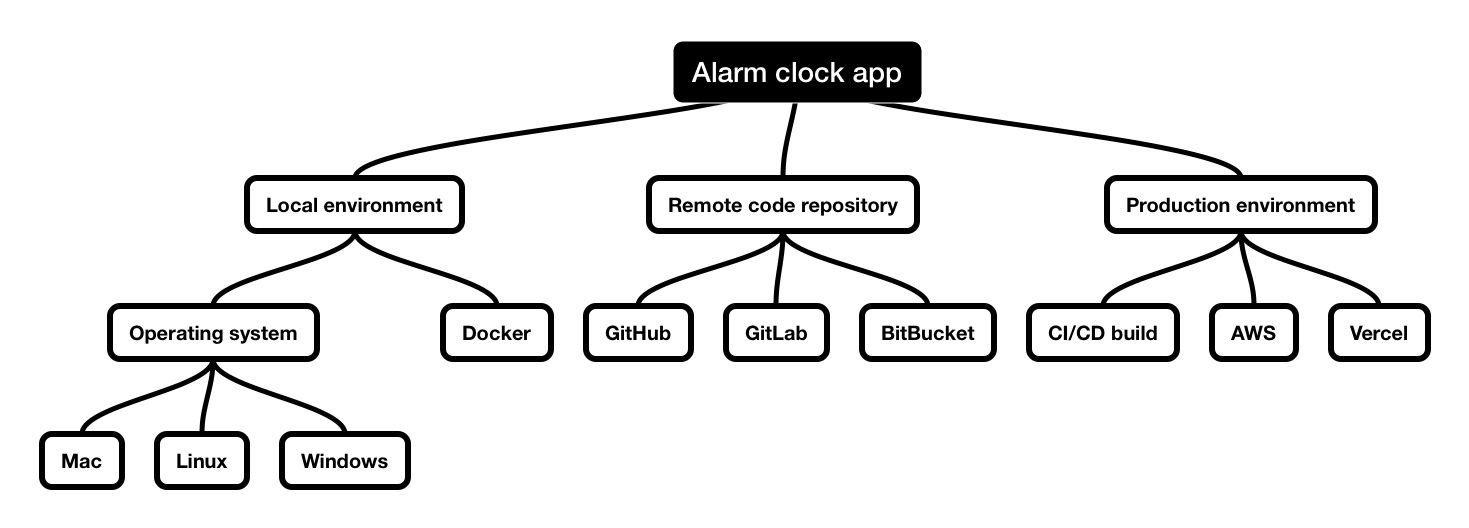
Well, in a typical software development process, your code lives in at least three places:
1. Development environment.
This is where you do your work. It could be simply your laptop or a Docker environment for more complicated setups.
2. Remote code repository
In the code repository, your and your colleague’s code is stored. It will often be a cloud-hosted solution like GitHub, GitLab, BitBucket or any other provider.
3. Production environment
From the code repository, your code will be placed or ‘deployed’ to the production environment. This means your code will run on your user’s devices once they visit your app.

You can probably begin to see the complexity of sharing the code.
Now picture this: you work with three other developers on the same Alarm Clock App project. All of them are changing the duplicate files and need to work on their features in the app.
We can illustrate this example further: John is implementing a push notification feature, while Jack is implementing a snooze button. The code they write both consumes Jane’s service.
They all work at different speeds but must stay in sync on all changes in the codebase.
Now, let’s go even further. Let’s say Jane needs to go back in time to revert some of her changes.
Version control systems provide a standardised solution for these issues.
When I first started coding, I had a rudimentary understanding of version control systems. This would cause me to end up in situations where I would finish my feature on time but struggle to get my code to the repository and then to production.
I was lucky to have supportive colleagues who would help me, but I wish I had invested time in understanding GIT well earlier.
But almost five years later, I still see professional developers with several years of experience struggling with GIT. They often can work in a predefined workflow but can’t integrate their changes into the code repository whenever a more complex situation arises.
Not knowing how to use version control systems well causes deployment problems, increases stress and blocks other colleagues from deploying changes.
This is why investing time in learning them is as essential as writing the code.
Historical perspective
Version control is not a new issue. Version control systems, abbreviated VCS, first appeared in the 1970s.
The first version control system was SCCS (Source Code Control System), developed by Marc Rochkind at Bell Labs in 1972.
Bell Labs originated from the company founded by Alexander Graham Bell, who invented the phone in the late 1800s.
Many other groundbreaking technologies like C, C++ and Unix have been created in Bell Labs over the years.
SCCS was used to manage the source code of the UNIX operating system.
It was a centralized VCS, meaning all code changes were made to a central repository. This made it difficult for multiple developers to work on the same codebase simultaneously on different machines.
When applying this solution to our previous ‘Alarm Clock App’ example, you can see that Jane, Jack and John would have a rough time working with this type of solution on different features simultaneously as they would keep overriding each other’s changes.
Interestingly, the paradigm of having a centralised code repository stayed around for more than 30 years. At the start of my career in coding, I still came across codebases created in the late 2000s that used the Apache Sub Version (abbreviated SVN).
Distribution + branches = faster development
It wasn’t until 2005 when Linus Torvalds (creator of the Linux operating system) came up with GIT, which stands for Global Information Tracker. GIT embraced the distributed nature of modern software development as it was designed to be run on and stored on multiple machines.
He was dissatisfied with the existing version control systems available at the time, such as CVS and Subversion. He wanted a system that was faster, more flexible, and better suited to the kind of distributed development that the Linux kernel required.
Torvalds released Git as open-source software under the GNU (General Public License). It quickly gained popularity within and outside the Linux community, and today it’s the default tool for managing versions within the codebase for most software companies.
What made it special was its revolutionary decentralized branch system was way more scalable than a centralised SVN’s approach.
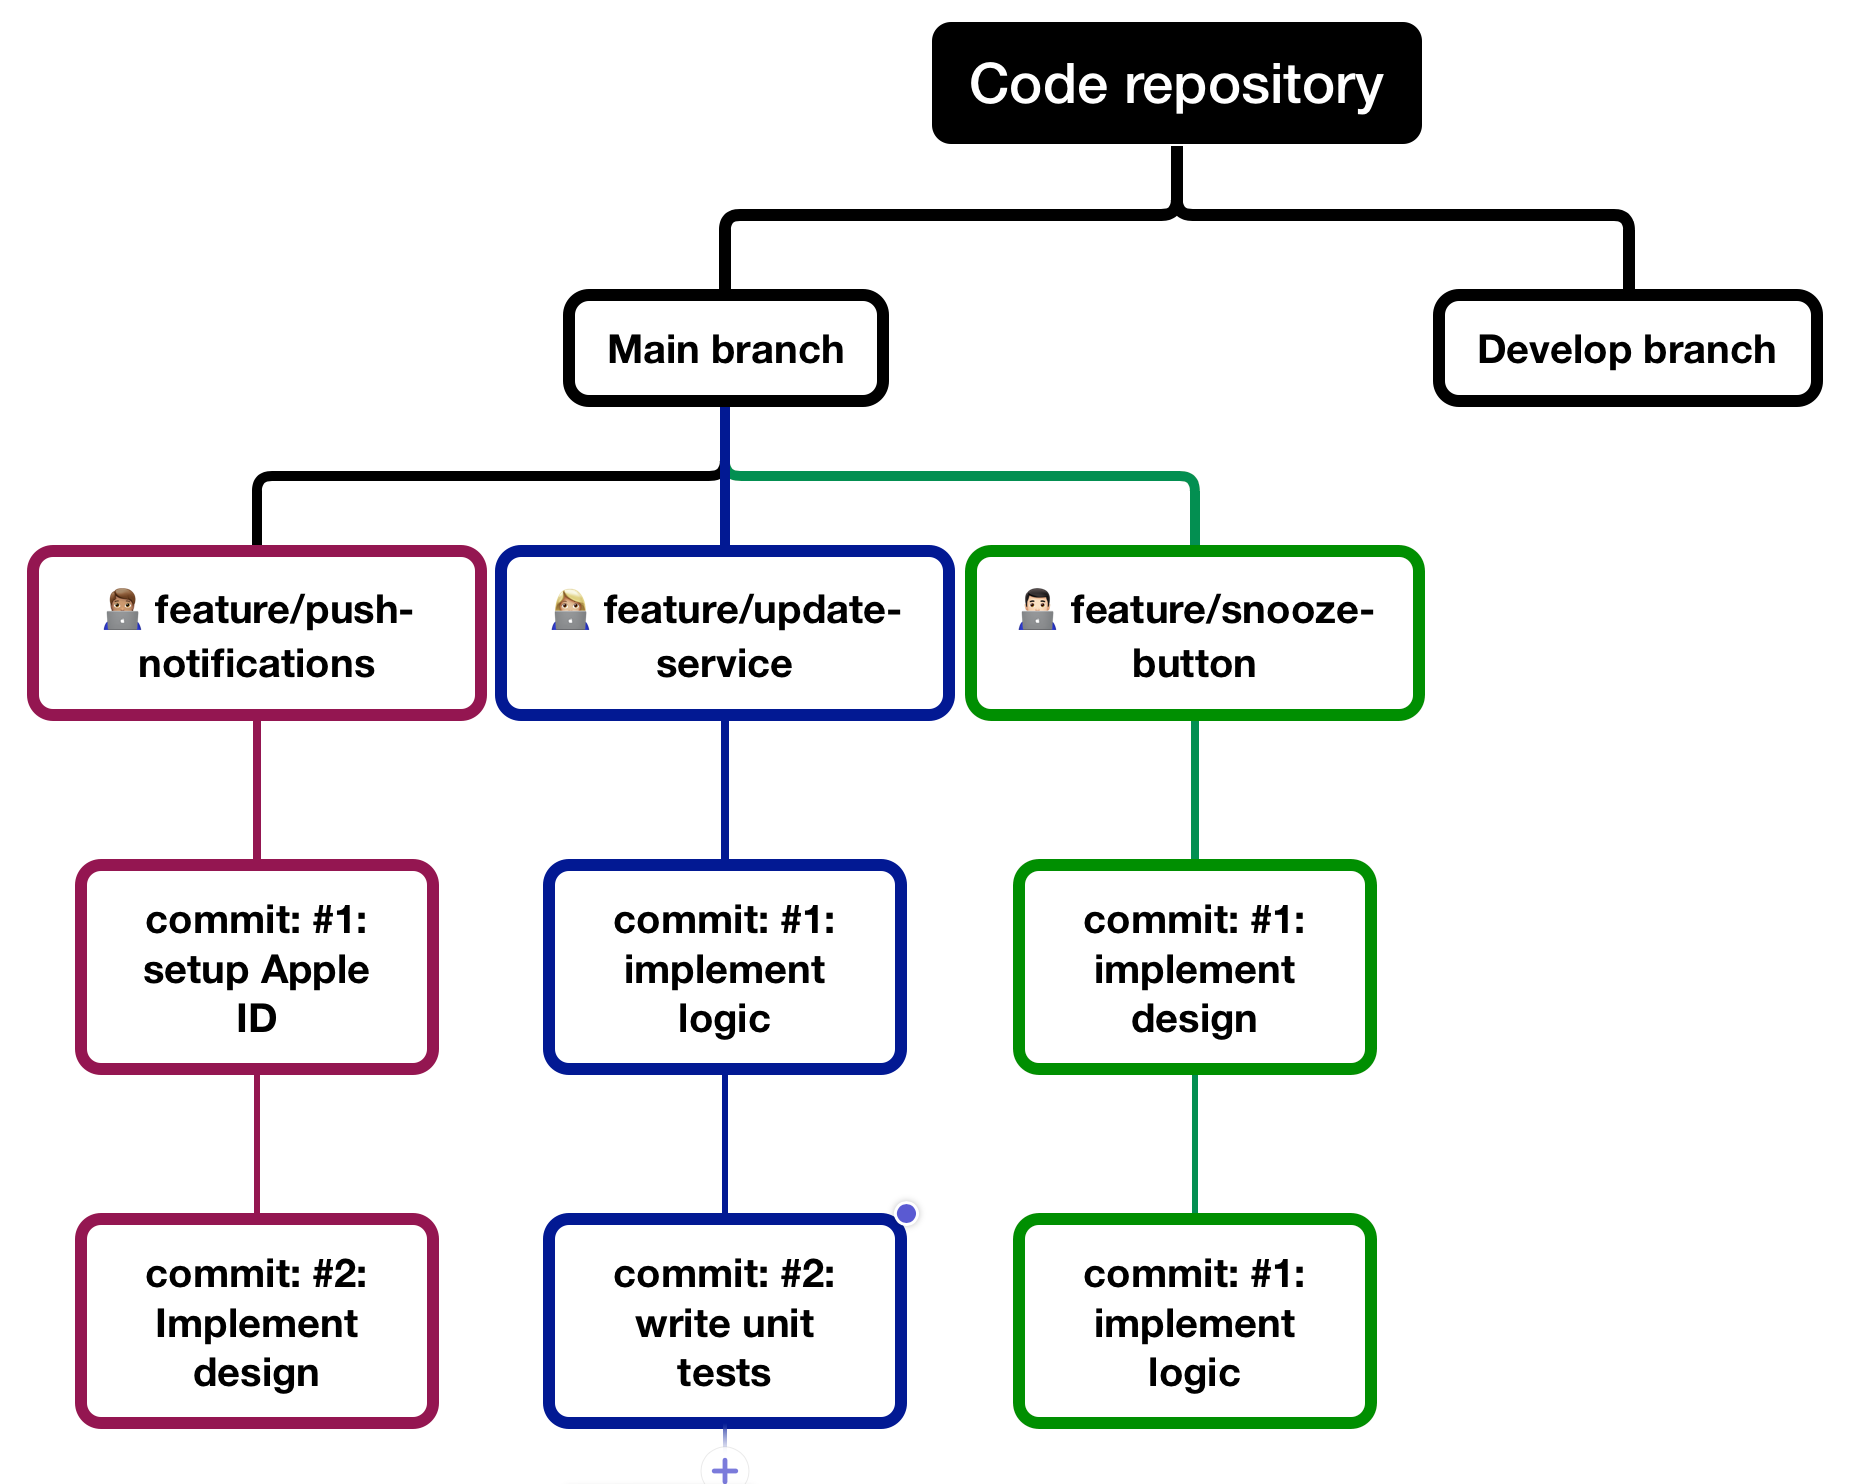
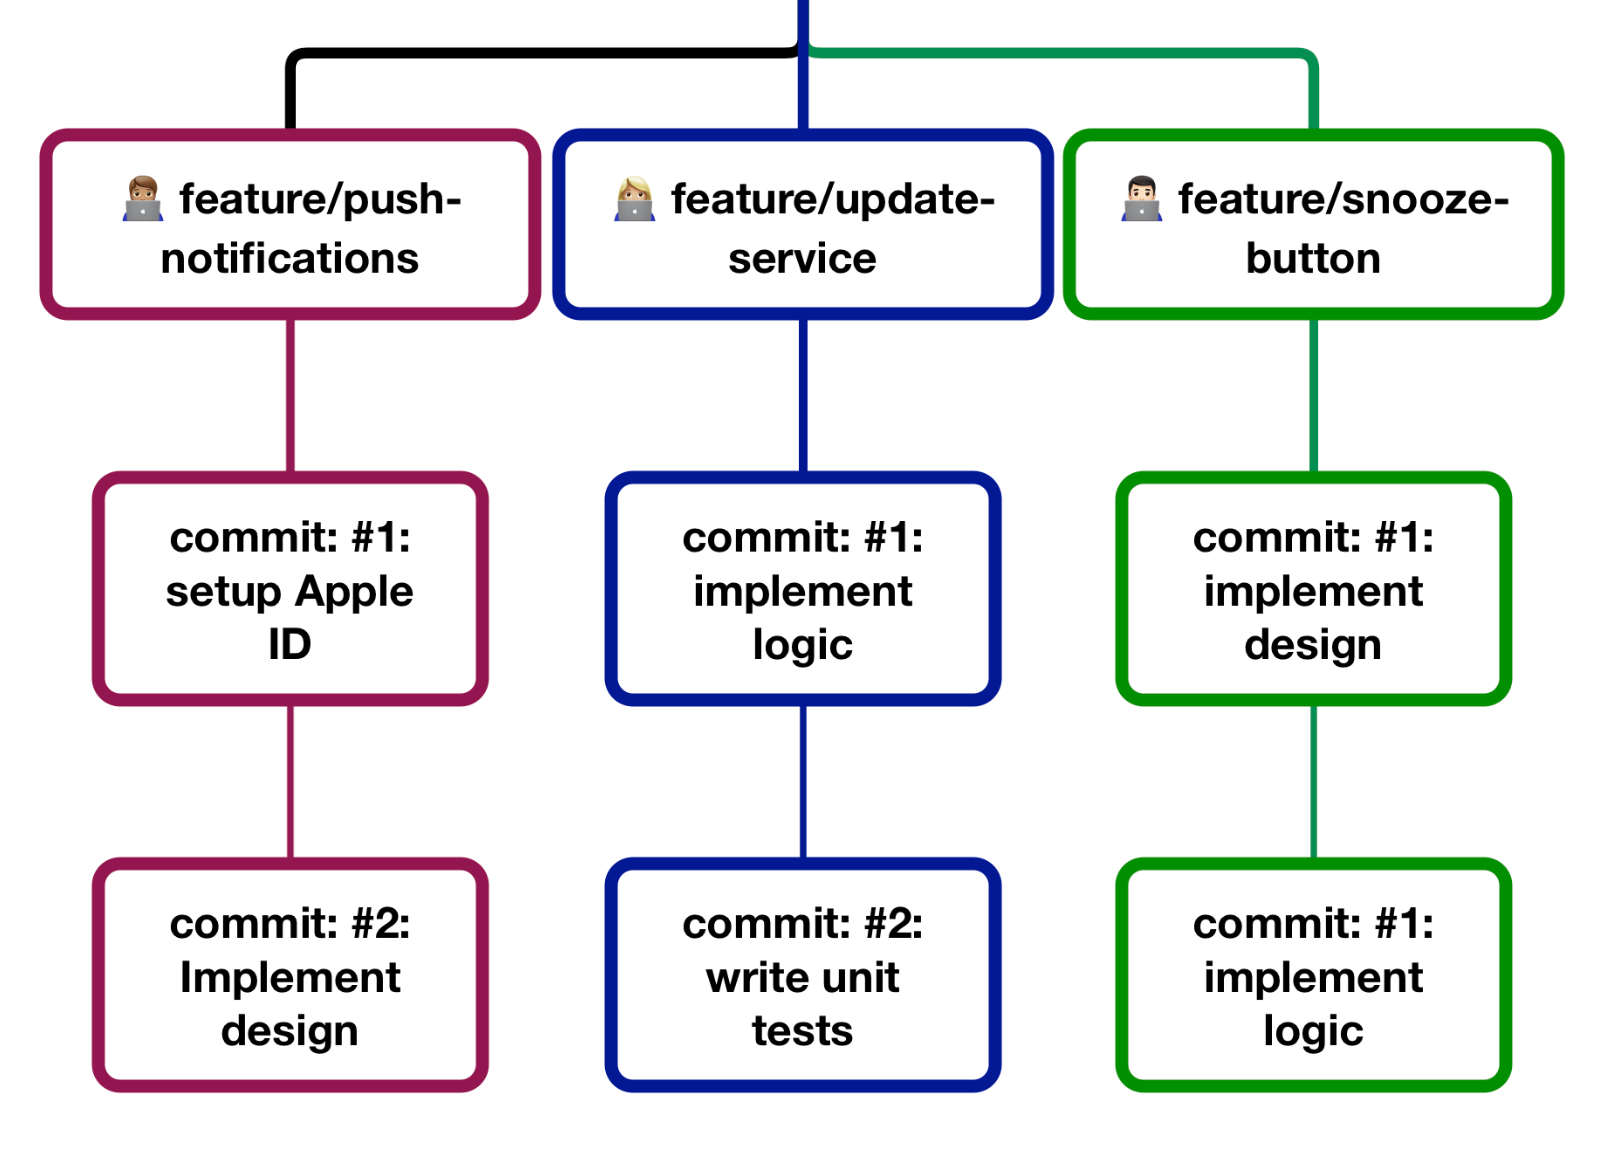
In the illustration above, you can see feature GIT branches visualized. John, Jack and Jane can work on their respective features independently of each other.
They all have the exact copy of the main branch in their development environment, making distributed development easier and faster than SVN.
- Centralized vs distributed: SVN is a centralized version control system, meaning all code changes are stored on a central server. Git, on the other hand, is a distributed version control system, meaning that each developer has a local copy of the repository.
- Branching: In SVN, branching is a heavy operation requiring much manual work. In Git, branching is lightweight and easy to do. This is because Git stores all changes locally; creating a new branch creates a new pointer to an existing commit.
- Merging: In SVN, merging branches can be difficult and time-consuming, especially if there are conflicts between the changes in the different branches. Git makes merging much more manageable, thanks to its lightweight branching and advanced merging algorithms.
- Workflow: SVN is designed around a centralized workflow, where all developers work on the same codebase and commit their changes to a central repository. Git, on the other hand, is designed around a distributed workflow, where each developer has their local copy of the repository and can work on their changes independently.
- Speed: SVN can be slow, especially when dealing with large codebases or repositories. Git is generally much faster than SVN, thanks to its distributed architecture and the fact that it stores all changes locally.
How to start using GIT?
Step 1: Install GIT
The first step is to install GIT. You can download and install it from the official website. The download instructions are available for Windows, Mac and Linux.
Once installed, open the terminal or command prompt and type ‘git –version‘. This command will display the version of GIT that you have installed.
Step 2: Create a Repository
The next step is to create a repository. A repository is a place where you store your code.
To create a repository, open the terminal or command prompt and navigate to the folder where you want to create the repository. Then type ‘git init’. This command will create a new repository in the current folder.
Step 3: Add and Commit Changes
Once you have created a repository, you can add your code.
First, you can view the status of your files in the repository by typing ‘git status‘.
To add a file to the repository, type ‘git add {file name}‘.
This command will add the file to the staging area.
Once you have added all the files that you want to commit, type ‘git commit -m “Commit message”‘. This command will commit the changes to the repository.

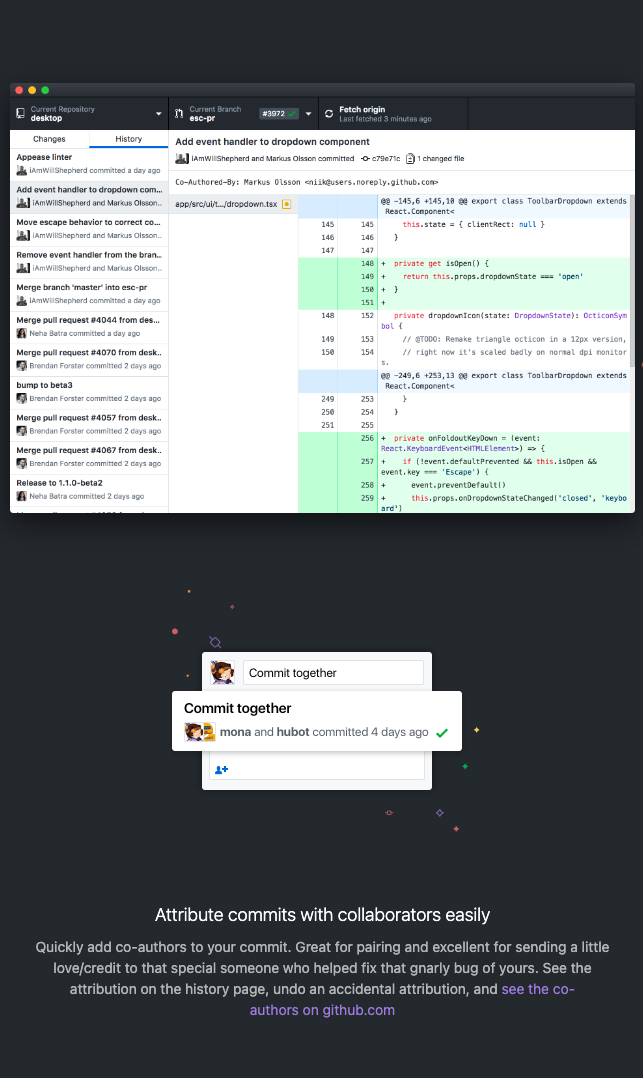
You can preview the files you’ve changed visually if you’re using code editors like Vscode or IntelliJ.
Step 4: Create and Merge Branches
GIT allows you to create branches. A branch is a copy of the code you can work on independently.
Type ‘git branch {branch name}‘ to create a branch. This command will create a new branch.
To switch to the new branch, type ‘git checkout {branch name}‘.
Once you have made changes in the new branch, you can merge it with the master branch by typing ‘git merge {branch name}‘.

Step 5. Push Changes to the Remote Repository
Once you have made changes and committed them to the local repository, you can push them to the remote repository. To push changes to the remote repository, type ‘git push’. This command will push the changes to the remote repository.
If you need additional help pushing to a remote repository, GIT providers like GitHub usually have other documentation on how to do so. Below I’ve attached a screenshot from the GitHub documentation.
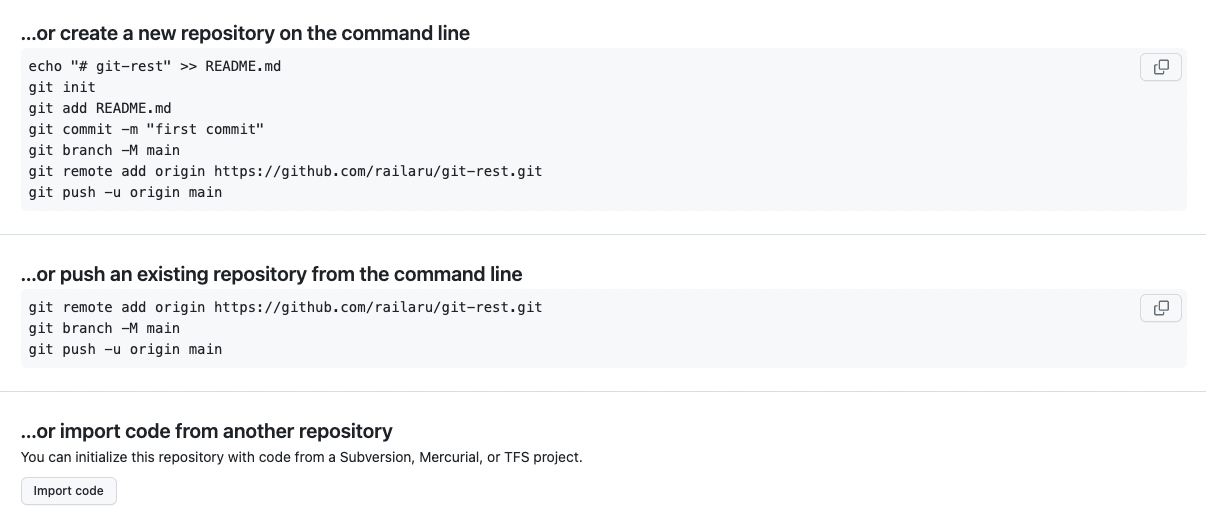
After pushing your changes to the remote repository, they appear in the commits tab.
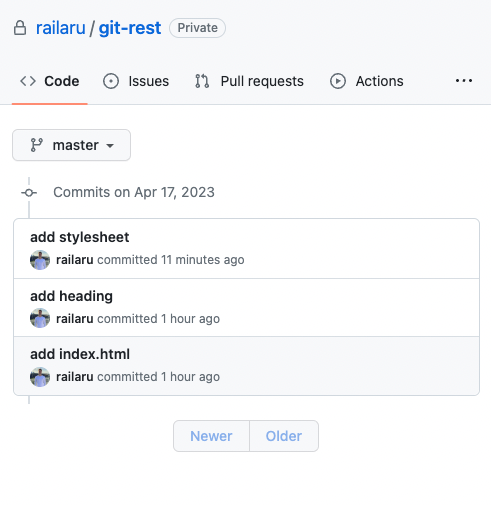
Connecting what we just learned to the initial example
To return to our initial ‘Alarm Clock App’ example commits made by Jane, Jack, or John would be visible in the commit history, making it easier to see what was changed over time and coming back if needed.
How do teams use GIT?
So far we’ve discussed what GIT is, why it’s important in writing code, the history of it and how to use it.
But how do you use it effectively while working in the team? What business problems does GIT solve in the context of a large software project?
Delivering high-quality code that is scalable and maintainable
GIT helps ensure code quality by allowing developers to collaborate with each other and review each other’s code by making merge requests.
This helps catch bugs and other issues early on in the development process.
Coordinating with other team members to ensure that everyone is on the same page
GIT provides a single source of truth for code where all team members can access the latest version of the codebase.
This ensures that everyone is working with the same version of the code and helps prevent file version miss match or compatibility issues.
Meeting project deadlines
GIT’s branching and merging features can help speed up the development process by allowing developers to work on separate features or bug fixes simultaneously without interfering with each other’s work.
Working in parallel help ensure that the project is completed on time.
Ensuring that the code is well-documented and easy to understand
Git history can help tell a story of why certain development decisions were made which influence the current decisions you might need to make now.
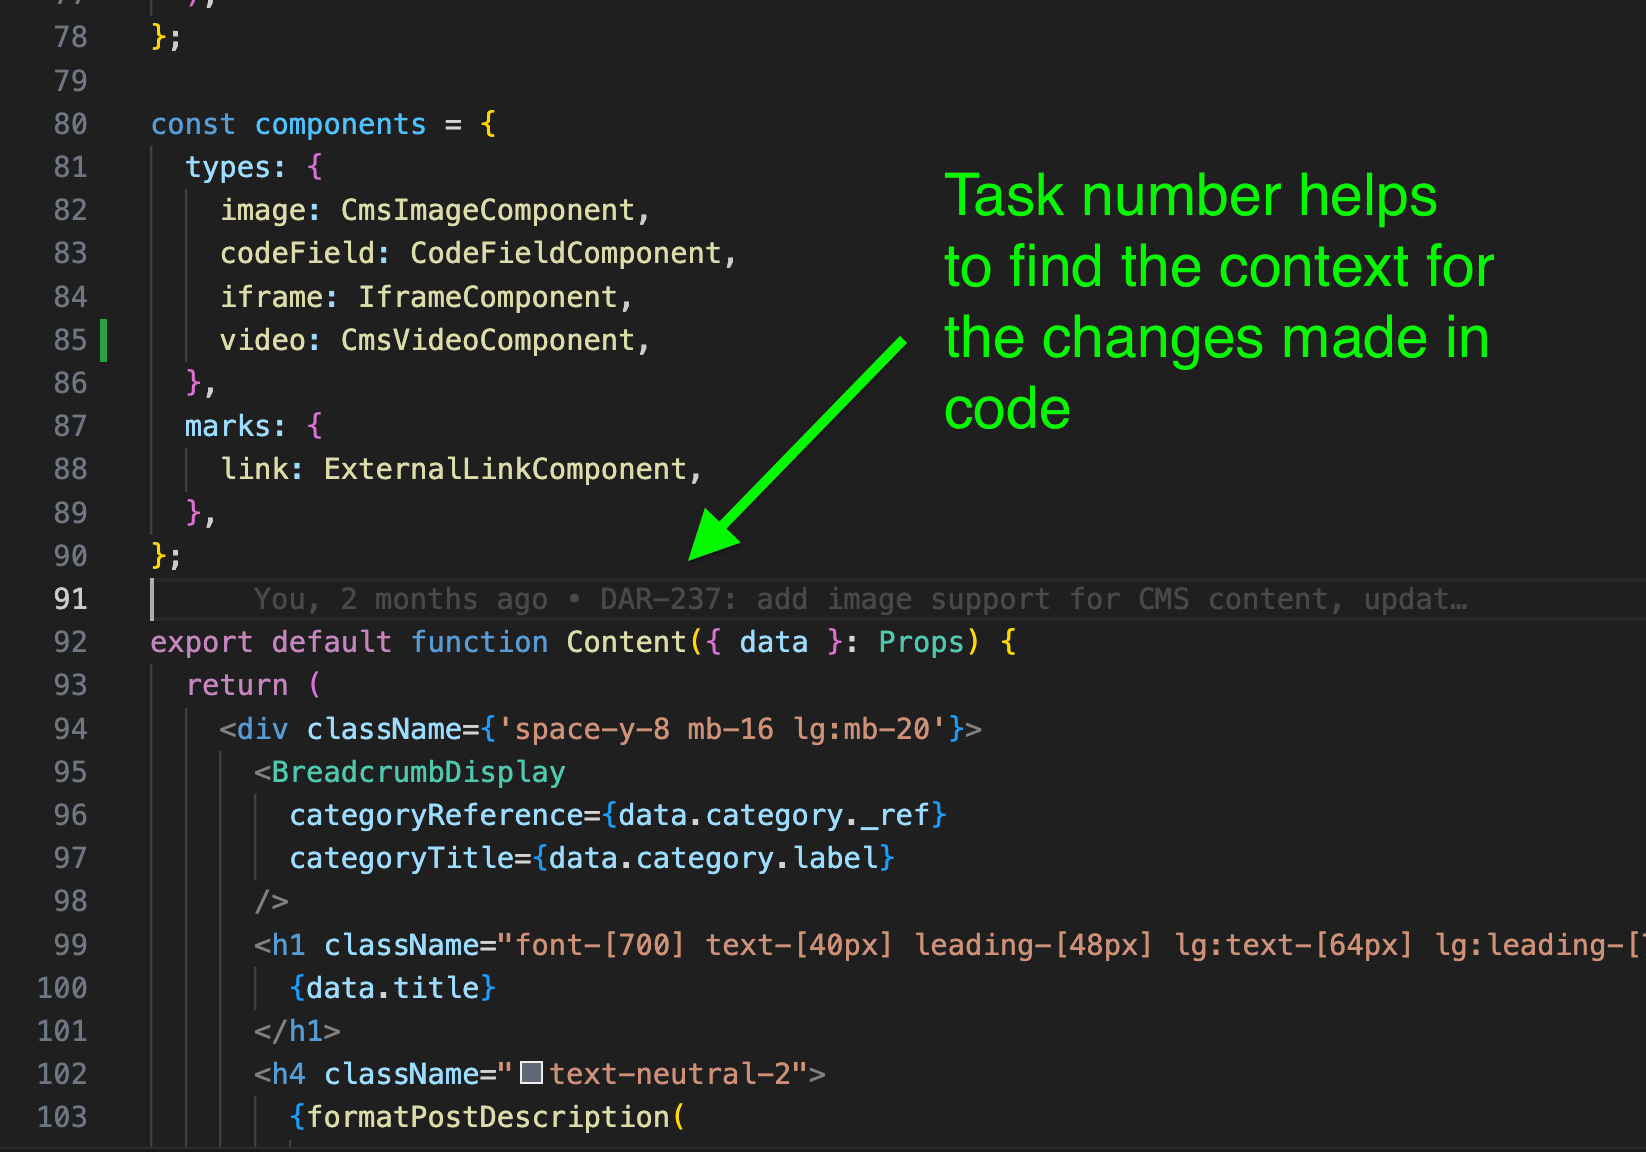
Task manager tools like Jira typically have task numbers.

Adding task numbers to branch names and commits is a powerful way to document the code changes because the future developers can find the task in question.
I find it really useful to see all the design and feature requirements as well as the comment history connected with the codebase in one place.
Testing the code thoroughly to ensure that it is free from bugs and errors
GIT branches makes it possible to create different environments for running code. Typically projects have production, staging environment and development environments.
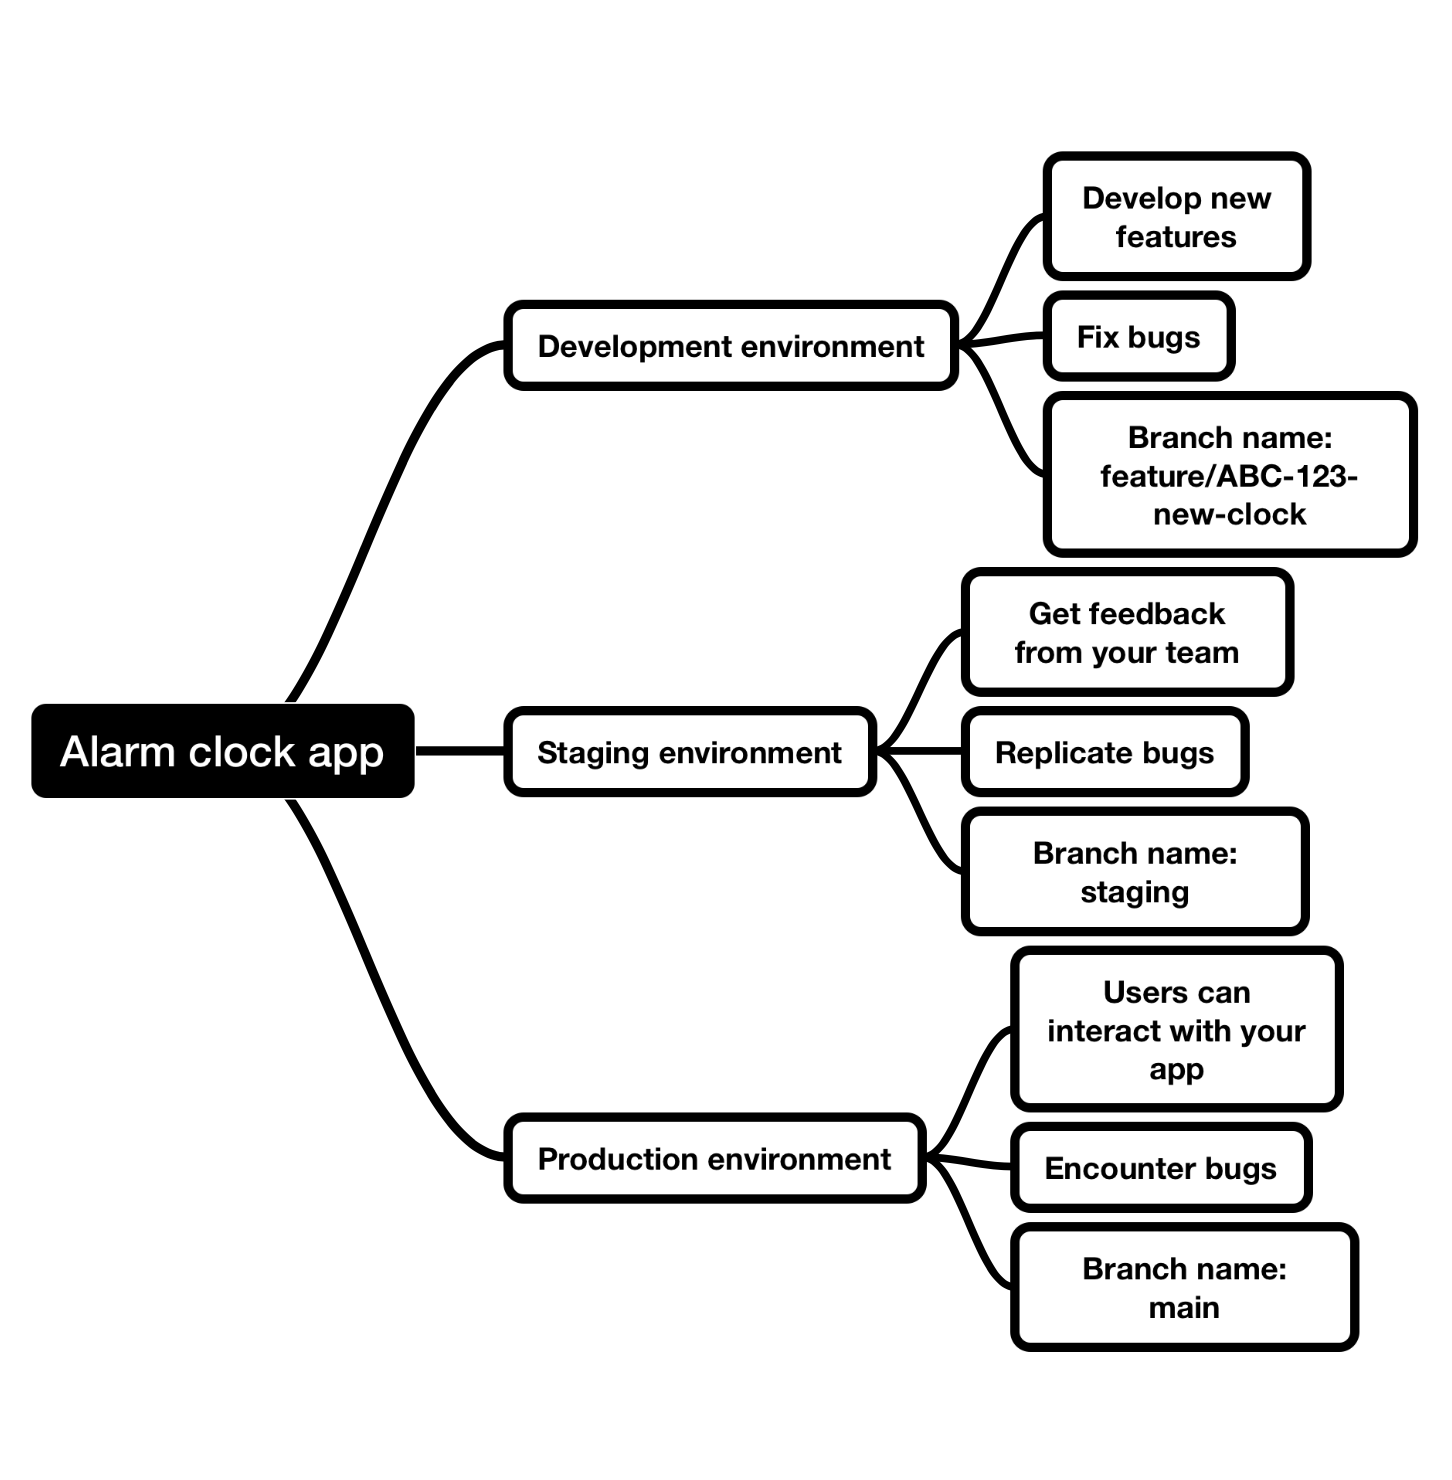
These environments are the exact copies of the production environment where your app’s users interact with it and encounter real life bugs.
By having the staging and development environments you can replicate these bugs and fix them safely.
An alternative to the staging environment is having feature branch previews. It allows you to essentially have individual staging environments for each feature being developed in your team. It increases the productivity even more, because some features are so large that they can’t be deployed to staging before affecting other changes which in larger teams can cause development bottlenecks.
If you’d like to learn more I wrote an overview of how feature branches work on the Vercel platform here.
Communicating effectively with clients and stakeholders to ensure that their needs are being met
GIT’s preview or staging branches can help clients to see projects or individual features before they’re delivered to production.
To illustrate this, we can use our previous Alarm Clock App example:
1. Jack implements the snooze button functionality
2. The client logins to the app in the staging environment
3. The client confirms that the snooze button works correctly
4. Jack creates a merge request.
5. Jane and Josh review his code
6. The snooze button functionality is deployed to production, where all the app’s users can see and use it.
Providing ongoing support and maintenance for the code after it has been released
GIT’s branching and merging features allow a part of the team to work on fixing a bug while the other part continues to work on new features.
This can help ensure that updates or bug fixes are implemented quickly and efficiently.
Additionally, GIT’s version control features allow developers to track changes and roll back to previous versions if necessary, which can help troubleshoot or revert changes that caused issues.
For larger teams and products staging environment can be limiting and they prefer to work with feature toggles in one branch.
In such cases no feature branches are made and feature toggles are used to simulate environments.
If you wish to read more about feature toggles here’s a Wikipedia entry with more information
Practical GIT advice
Now that we looked at the business benefits of using GIT let’s go further and see how you can name things well in commit messages:
Use present tense
Use present tense verbs in your commit messages to describe what the commit does.
For example:
git commit -m "Add new feature"Instead of:
git commit -m "Added new feature"This helps keep the messages shorter while conveying the same amount of information.
Keep it clear and concise
Your commit message should be brief and to the point, summarising the main changes made in the commit.
Bad:
git commit -m "updated checkout page button colour to match the design"Good:
git commit -m "ABC-123: update checkout button style"Pro tip: a big part of making things concise is using the correct scope of the changes. You only need to add relevant information in the commit message if you link a task number.
Use a consistent format
Establish a consistent format for your commit messages across your team to make them easier to read and understand. For example, you could start each message with a verb and a brief description of the changes made.
Overtime you’ll enjoy efficiency gains from such commit messages as having a consistent format will reduce the time needed to come up with a commit name when creating changes, and also save you time when you’ll need to look for old changes in the codebase.
Avoid meaningless messages
Some messages are hard to understand for other developers working on the codebase, especially if there has been some time after changes have been made.
Bad commit message examples:
git commit -m "checkout changes"
git commit -m "refactor modal"
git commit -m "button style"
git commit -m "revert changes"
git commit -m "test pipeline"
I have to admit that I’ve also written such messages in the past. Looking back, I imagine it would be tough for other developers to trace why a specific commit was made.
Here’s how I would improve them:
Good commit message examples:
git commit -m "ABC-1: update checkout styling"
git commit -m "ABC-2: add accessibility to modal"
git commit -m "ABC-3: update button style"
git commit -m "ABC-4: revert to commit #42134"
git commit -m "ABC-5: test e2e setup in ci/cd"
Proofread your message
Double-check your commit message before submitting it to ensure that it is clear, concise, and free of errors or typos.
Common gotchas:
Here are the most common problems I have had and see other developers run into when using GIT.
Problem: Not really understanding how GIT really works. You get stuck when you’re required to go off a beaten path in terms of how you usually work with GIT.
For example, you need to stash your local changes or go back to a specific commit.
Solution
Take the time to study the fundamentals of GIT. It’s one of the few technologies that have not changed much in the last 18 + years, so understanding it well will pay off your productivity.
I recommend checking out this GIT Cheatsheet and trying these commands yourself.
Problem: Large merge requests
Creating merge requests with 70 + files make it really hard for reviewers to do a high-quality code review of what was changed. This might lead to bugs and unexpected behaviour.
Solution
Use stacked merge requests. You can split your large merge request into multiple smaller merge requests.
Let’s say you’re implementing a large feature for a fully accessible modal. You’re likely to write a lot of code to implement it. When you’re finished writing your code and create a merge request with GIT, it would result in many changed files, which would take a long time for reviewers to check.
To solve the large file difference (or diff) issue, you can split it into multiple branches using the following commands:
git checkout -b feature/ABC-2-modal-actions feature/ABC-1-modal

git checkout -b feature/ABC-3-modal-accessibility feature/ABC-1-modal
In the illustration above, you can see a stacked branch example visualized.
Problem: Committing too rarely
Committing code changes in large chunks can make it hard to revert to the previous version if needed.
Solution
A good rule of thumb is to commit in blocks based on the business functionality of the functionality you’re working on, not on the technical change increments. That way, in the GIT history, your change will appear more human-readable.
To relate to your accessible modal example, I would commit it like this.
Good commit message examples:
git commit -m "ABC-1: implement static design for modal"
git commit -m "ABC-1: make modal theme customisable"
git commit -m "ABC-1: make modal accessible"
I would avoid naming my commits like this.
Bad commit message examples:
git commit -m "ABC-1: configure MUI and Tailwind for modal"
git commit -m "ABC-1: add MUI constants for modal"
git commit -m "ABC-1: add ARIA labels to modal"
These commit messages above make it hard to read such GIT history for team members who are not yet familiar with the technology in question.
As a new joiner to the team, I would prefer to see the functionality or business requirement-based messages.
If I need to see the specific technologies used to make the changes, I can click on the commit and see what libraries were imported or configured.
Bonus
If you have a more visual brain and you find that typing the GIT commands in your terminal is not optimal, you might find it easier to use the following graphical tools:
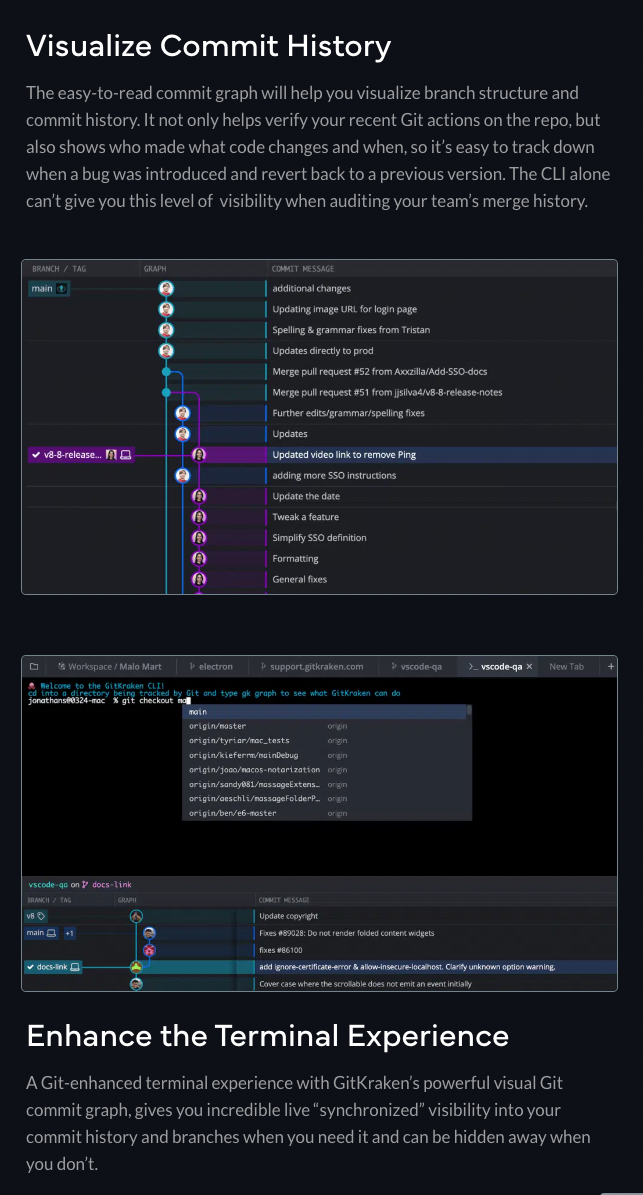
GitKraken: A popular Git client with a user-friendly interface that visually represents your Git repository.
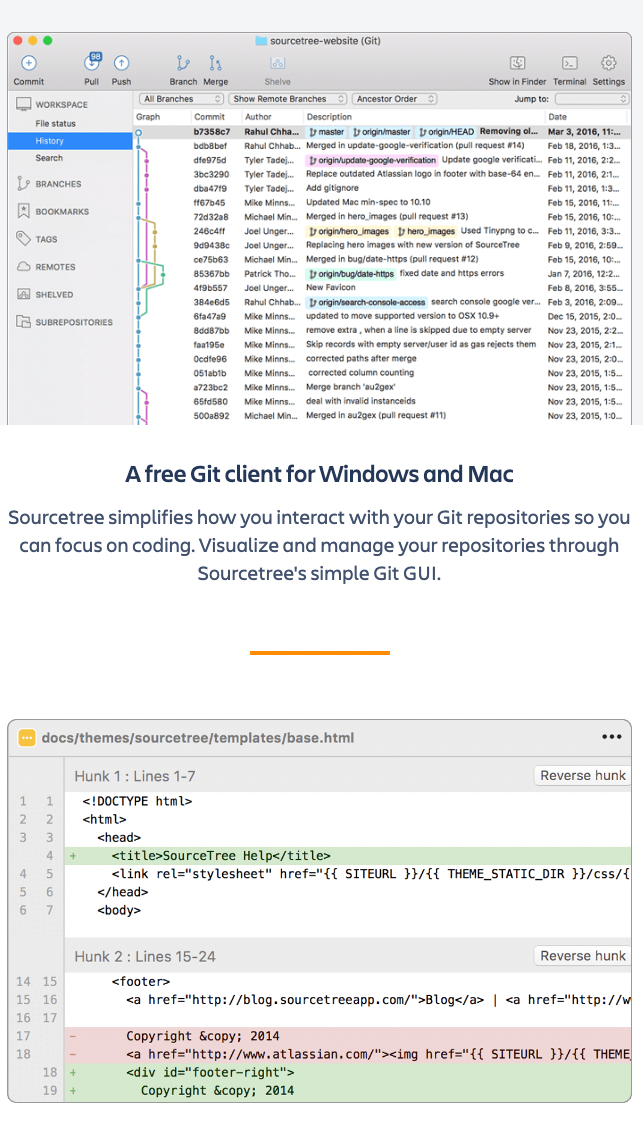
Sourcetree: A free Git client that visually represents your Git repository and streamlines your Git workflow.
GitHub Desktop: A Git client that provides a visual interface for managing Git repositories on GitHub.
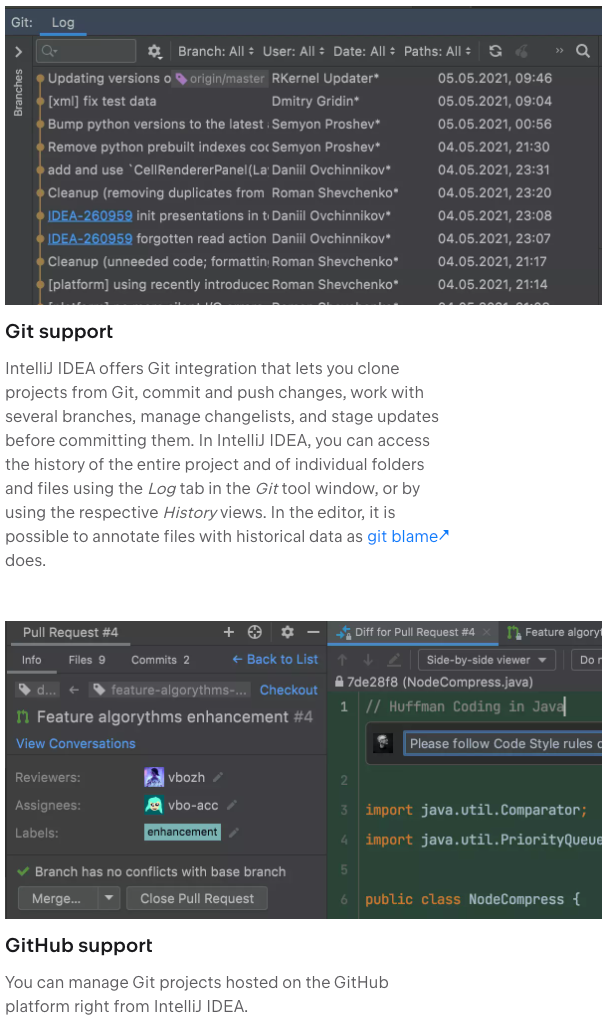
JetBrains IDEs: You can view your git history straight in your code editor.
Summary
In summary, knowing how to use GIT is an essential skill every developer should have.
GIT allows you to easily collaborate with other team members and manage the project files more effectively.
Additionally, using GIT gives you confidence in your work and allows you to easily track or revert changes to your code.
With this valuable tool at your disposal, you can focus on creating high-quality code and delivering exceptional results to your clients.
The key takeaways from this guide are:
- Version control is an old concept which has, in many ways, remained very similar to the initial idea, so it’s worth investing your time to learn this technology well, as it’s likely to stay very similar for a long time. You won’t need to relearn the core concepts.
- GIT, by far, has the most significant market share out of all VCS technologies.
- You learned how to install and use GIT.
- You learned some of the ways how software teams name their GIT branches and commit changes.
- You learned about the user interface-based tools for GIT in case you prefer them to use the text-based terminal.
Thanks for reading!
See you next week.
Further learning
You can follow these links if you would like to dig into the history of GIT and its more advanced commands.